![Whirlpool WBE 3321 ANFW — проблемы с автоматической льдогенерацией и их решения [10/52]](/img/pdf.png)
Whirlpool WBE 3321 ANFW — проблемы с автоматической льдогенерацией и их решения [10/52]
![Whirlpool WBE 3321 ANFW [10/52] Electrical connection](/views2/2004737/page10/bga.png)
10
• Is the automatic ice maker ON/OFF button set
to ON?
• Make sure the lever of the automatic ice maker,
inside the freezer compartment, is not turned to
OFF, i.e. in the horizontal position (on some
models).
• Is the water turned on? Is water getting to the
automatic ice maker?
• Is there a water filter installed on the appliance
(on some models)? This filter may be clogged or
installed incorrectly. First, check the filter
installation instructions to ensure that the filter
was installed correctly and is not clogged. If
installation or clogging is not a problem, call a
qualified person or a technician.
If there is water in the defrost pan:
• This is normal in hot, damp weather. The pan can
even be half full. Make sure the appliance is level
so that the water does not overflow
If the edges of the appliance cabinet, which
come in contact with the door seal, are warm
to the touch:
• This is normal in hot weather and when the
compressor is running.
If the light does not work:
• Have you checked the protection devices and
fuses of the electrical system in your home?
• Is the power cable plugged into a live socket with
the proper voltage?
• Has the light bulb burnt out?
In the case of burnt-out bulbs:
1. Always unplug the appliance from the mains.
2. See chapter “Maintenance and Cleaning”.
If the motor seems to run too much:
• Is the condenser free of dust and fluff?
• Are the doors properly closed?
• Are the door seals properly fitted?
• On hot days or if the room is warm, the motor
naturally runs longer.
• If the appliance door has been left open for a
while or if large amounts of food have been
stored, the motor will run longer in order to cool
down the interior of the appliance.
• Motor running time depends on different things:
number of door openings, amount of food
stored, temperature of the room, setting of the
temperature controls.
If the appliance temperature is too high:
• Are the appliance controls correctly set?
• Has a large amount of food been added to the
appliance?
• Check that the doors are not opened too often.
• Check that the doors close properly.
• Make sure that air flow vents inside the
compartment are not blocked, as this prevents
the circulation of cold air.
If there is moisture build-up:
• Make sure that air flow vents inside the
compartment are not blocked, as this prevents
the circulation of air.
• Make sure that the food is properly packaged.
Dry any dampness on food containers before
placing them in the appliance.
• Check that the doors are not opened too often.
When the door is opened, humidity from the
room air enters the appliance. The more often
the door is opened, the faster humidity builds up,
especially when the room itself is very humid.
• If the room is very humid, it is normal for
moisture to build up inside the refrigerator.
If the doors do not open and close properly:
• Check that food packages are not blocking the
door.
• Check that the internal parts or automatic ice
maker are not out of position.
• Check that the door seals are not dirty or sticky.
• Ensure the appliance is level.
AFTER-SALES SERVICE
Before contacting After-Sales Service:
Switch the appliance on again to see if the problem
has been solved. If it has not, disconnect the
appliance from the power supply and wait for about
an hour before switching on again.
If, after performing the checks described in the
Troubleshooting Guide and switching the appliance
on again, your appliance still does not work properly,
contact the After-sales Service, explain the problem.
Specify:
• the model and appliance serial number (stated on
the rating plate),
• the nature of the problem,
• the Service number (the number after the word
SERVICE on the data plate on the inside of the
appliance),
• your full address,
• your telephone number and area code.
Note:
The direction of door opening can be changed.
If this operation is performed by After-sales
Service it is not covered by the warranty.
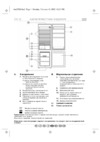
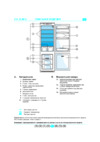
ELECTRICAL CONNECTION
1) For Great Britain only
Warning - this appliance must be earthed
Fuse replacement
If the mains lead of this appliance is fitted with a BS
1363A 13amp fused plug, to change a fuse in this
type of plug use an A.S.T.A. approved fuse to BS
1362 type and proceed as follows:
1.Remove the fuse cover (A) and
fuse (B).
2.Fit replacement 13A fuse into
fuse cover.
3.Refit both into plug.
Important:
The fuse cover must be refitted
when changing a fuse and if the fuse
cover is lost the plug must not be
used until a correct replacement is fitted.
Correct replacement are identified by the colour
insert or the colour embossed in words on the base
of the plug.
Replacement fuse covers are available from your
local electrical store.
2) For the Republic of Ireland only
The information given in respect of Great Britain
will frequently apply, but a third type of plug and
socket is also used, the 2-pin, side earth type.
3) Socket outlet / plug (valid for both countries)
If the fitted plug is not suitable for your socket
outlet, please contact Whirlpool Service for further
instruction. Please do not attempt to change plug
yourself. This procedure needs to be carried out by
a qualified Whirlpool technician in compliance with
the manufactures instructions and current standard
safety regulations.
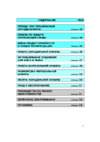
Содержание
- Vor dem gebrauch des geräts p.3
- Vor dem gebrauch des gerätes p.3
- Informationen zum umweltschutz p.3
- Gebrauchsanweisung p.3
- T von 16 bis 43 von 61 bis 110 p.4
- St von 16 bis 38 von 61 bis 100 p.4
- Sn von 10 bis 32 von 50 bis 90 p.4
- Raumtemp p.4
- N von 16 bis 32 von 61 bis 90 p.4
- Klimaklasse raumtemp p.4
- Allgemeine hinweise und ratschläge p.4
- Störung was tun p.5
- Pflege und reinigung p.5
- Hinweise zur ausserbetriebsetzung p.5
- Auswechseln der glühbirne p.5
- Kundendienst p.6
- Safeguarding the environment p.7
- Instruction for use p.7
- Before using the appliance p.7
- T from 16 to 43 from 61 to 110 p.8
- St from 16 to 38 from 61 to 100 p.8
- Sn from 10 to 32 from 50 to 90 p.8
- Precautions and general recommendations p.8
- N from 16 to 32 from 61 to 90 p.8
- Amb t c amb t f p.8
- Recomandation in case of no use of the appliance p.9
- Maintenance and cleaning p.9
- Troubleshooting guide p.9
- Replacing the bulb p.9
- Electrical connection p.10
- After sales service p.10
- Stockage des denrées dans les réfrigérateurs et règles d hygiène alimentaire p.11
- Respect des règles d hygiène alimentaire p.11
- Mode d emploi p.11
- Maîtrise de la température p.11
- Conseils pour la protection de l environnement p.11
- Avant d utiliser l appareil p.11
- T de 16 à 43 de 61 à 110 p.12
- T amb c t amb f p.12
- St de 16 à 38 de 61 à 100 p.12
- Sn de 10 à 32 de 50 à 90 p.12
- Précautions et recommandations générales p.12
- N de 16 à 32 de 61 à 90 p.12
- Remplacement de l ampoule p.13
- Périodes d inactivité p.13
- Entretien et nettoyage p.13
- Déménagement p.13
- Charte de dépannage p.13
- Service après vente p.14
- Milieutips p.15
- Gebruiksaanwijzing p.15
- Alvorens het product te gebruiken p.15
- Alvorens het apparaat te gebruiken p.15
- St van 16 tot 38 van 61 tot 100 p.16
- Sn van 10 tot 32 van 50 tot 90 p.16
- Omg temp p.16
- N van 16 tot 32 van 61 tot 90 p.16
- Klimaatklasse omg temp p.16
- Algemene voorzorgsmaatregelen en adviezen p.16
- T van 16 tot 43 van 61 tot 110 p.16
- Vervangen van het lampje p.17
- Opsporen van storingen p.17
- Onderhoud en reiniging p.17
- Aanbevelingen voor als het apparaat niet wordt gebruikt p.17
- Klantenservice p.18
- Instrucciones para el uso p.19
- Consejos para preservar el medio ambiente p.19
- Antes de usar el aparato p.19
- T de 16 a 43 de 61 a 110 p.20
- T amb c t amb f p.20
- St de 16 a 38 de 61 a 100 p.20
- Sn de 10 a 32 de 50 a 90 p.20
- Precauciones y sugerencias generales p.20
- N de 16 a 32 de 61 a 90 p.20
- Guía para la solución de problemas p.21
- Sustitución de la bombilla p.21
- Qué hacer cuando el aparato no se utiliza p.21
- Limpieza y mantenimiento p.21
- Servicio de asistencia técnica posventa p.22
- Manual de utilização p.23
- Conselhos para a protecção do ambiente p.23
- Antes de usar o produto p.23
- Antes de usar o aparelho p.23
- T de 16 a 43 de 61 a 110 p.24
- St de 16 a 38 de 61 a 100 p.24
- Sn de 10 a 32 de 50 a 90 p.24
- Precauções e sugestões gerais p.24
- N de 16 a 32 de 61 a 90 p.24
- Climática t amb c t amb f p.24
- Classe p.24
- Manutenção e limpeza p.25
- Substituição da lâmpada p.25
- Resolução de problemas p.25
- Recomendações em caso de não utilização do aparelho p.25
- Serviço de assistência técnica pós venda p.26
- Prima di usare l apparecchio p.27
- Prima di usare il l apparecchio p.27
- Istruzioni per l uso p.27
- Consigli per la salvaguardia dell ambiente p.27
- T da 16 a 43 da 61 a 110 p.28
- St da 16 a 38 da 61 a 100 p.28
- Sn da 10 a 32 da 50 a 90 p.28
- Precauzioni e suggerimenti generali p.28
- N da 16 a 32 da 61 a 90 p.28
- Climatica t amb c t amb f p.28
- Classe p.28
- Guida ricerca dei guasti p.29
- Sostituzione della lampadina p.29
- Raccomandazioni in caso di mancato utilizzo dell apparecchio p.29
- Manutenzione e pulizia p.29
- Servizio assistenza tecnica post vendita p.30
- Συμ βο υλεσγιατηνπρο στασιατο υ p.31
- Πρινχρησιμ ο πο ιησετετοπρο ϊο ν p.31
- Περιβαλλο ν το σ p.31
- Ο δηγιεσ p.32
- Μ ετραπρο φυλαξησκαιγεν ικεσ p.32
- Κλιματική p.32
- Κλάση p.32
- Θ ερμ περιβ p.32
- Standard_pages_gr_m layout 1 6 1 09 12 41 pm page 2 p.32
- Miljöråd p.35
- Innan apparaten används p.35
- Bruksanvisning p.35
- T frå n 16 till 43 frå n 61 till 110 p.36
- St frå n 16 till 38 frå n 61 till 100 p.36
- Sn frå n 10 till 32 frå n 50 till 90 p.36
- Omgivnings temperatur p.36
- N frå n 16 till 32 frå n 61 till 90 p.36
- Klimatklass p.36
- Försiktighetsåtgärder och allmänna förslag p.36
- Rengöring och underhåll p.37
- När apparaten inte används längre och kortare bortavaro p.37
- Felsökning p.37
- Byte av glödlampa p.37
- Service p.38
- M iljø vennligbruk p.39
- Før du bruker apparatet p.39
- Fø rdubrukerappara tet p.39
- Bruksanvisning p.39
- Miljøvennlig bruk p.39
- T fra16til43 fra61til110 p.40
- St fra16til38 fra61til100 p.40
- Sn fra10til32 fra50til90 p.40
- O m g tem p p.40
- N fra16til32 fra61til90 p.40
- Klim aklasse o m g tem p p.40
- G enerelleråd p.40
- Utskifting av lyspæren p.41
- Råd dersom ikke apparatet skal brukes i en periode p.41
- Rengjøring og vedlikehold p.41
- Feilsøking p.41
- Service p.42
- Før apparatet tages i brug p.43
- Fø r appara tet tag es i brug p.43
- Brugervejledning p.43
- Oplysninger om miljøhensyn p.43
- O plysning er o m m iljø hensyn p.43
- T fra 16 til 43 fra 61 til 110 p.44
- St fra 16 til 38 fra 61 til 100 p.44
- Sn fra 10 til 32 fra 50 til 90 p.44
- O m g tem p p.44
- N fra 16 til 32 fra 61 til 90 p.44
- Klim akategori o m g tem p p.44
- Advarsler o g g enerelle råd p.44
- Udskiftning af pæren p.45
- Rengøring og vedligeholdelse p.45
- Fejlfindingsoversigt p.45
- Anbefalinger i tilfælde af at apparatet ikke anvendes p.45
- Serviceassistance p.46
- Ennen tuotteen käyttöönottoa p.47
- Ennen laitteen käyttöönottoa p.47
- Ympäristönsuojelua koskevia ohjeita p.47
- Käyttöohje p.47
- Ymp lämpöt p.48
- Yleisiä varotoimia ja suosituksia p.48
- T 16 43 61 110 p.48
- St 16 38 61 100 p.48
- Sn 10 32 50 90 p.48
- N 16 32 61 90 p.48
- Ilmastoluokka ymp lämpöt p.48
- Vianmääritys p.49
- Lampun vaihtaminen p.49
- Jos laitetta ei käytetä pitkään aikaan p.49
- Huolto ja puhdistus p.49
- Huoltopalvelu p.50
- Whirlpool is a registered trademark of whirlpool usa copyright whirlpool europe s r l 2009 all rights reserved http www whirlpool eu p.52
- 337 02017 p.52
Похожие устройства
-
 Whirlpool WBE 3625 NF TSРуководство пользователя
 -
 Whirlpool ARC 5250Краткое руководство
 -
 Whirlpool ARC 5250Руководство пользователя
 -
 Whirlpool ARC 7190Краткое руководство
 -
 Whirlpool ARC 7190Руководство пользователя
 -
 Whirlpool ART 466Руководство пользователя
 -
 Whirlpool ART 466Краткое руководство
 -
 Whirlpool ART 481Руководство пользователя
 -
 Whirlpool ART 481Краткое руководство
 -
 Whirlpool WQ9 U2LИнструкция по эксплуатации
 -
Whirlpool WQ9 U1LИнструкция по эксплуатации
-
 Whirlpool WBA 43282 NFIXИнструкция по эксплуатации
Узнайте, как устранить проблемы с автоматическим льдогенератором. Проверьте настройки, фильтры и уровень воды для оптимальной работы устройства.