![Asus rog maximus viii extreme — управление удаленным доступом: настройка и использование [179/226]](/img/pdf.png)
Asus rog maximus viii extreme — управление удаленным доступом: настройка и использование [179/226]
![Asus rog maximus viii extreme [179/226] Remote desktop control notification](/views2/1162397/page179/bgb3.png)
ASUS MAXIMUS VIII EXTREME
4-29
Chapter 4
Remote Desktop Control Notification
Thisfunctionallowsyoutosendthecontrolauthorizationtoasmartdeviceanddirectlystart
usingRemoteDesktopinyourdevice.
TouseRemoteDesktopControlNotication:
1. ClickSelect Device.
2. Selectadevicefromthedroplist.
3. ClickSend tosendtheRemoteDesktopcontrolauthorizationtotheselecteddevice.
ThisfunctionrequiresthePush Noticefeaturetobeinstalled.YoucangetthePUSH
NoticeinstallerfromthebundledsupportDVDordownloadthelatestinstallerfrom
www.asus.com.
Содержание
- Motherboard p.1
- E10739 first edition august 2015 p.2
- Chapter 2 basic installation p.3
- Contents p.3
- Chapter 1 product introduction p.3
- Chapter 3 bios setup p.4
- Chapter 4 software support p.5
- Chapter 5 raid support p.6
- Appendix p.6
- Electrical safety p.7
- Safety information p.7
- Operation safety p.7
- Where to find more information p.8
- How this guide is organized p.8
- About this guide p.8
- Typography p.9
- Conventions used in this guide p.9
- Maximus viii extreme specifications summary p.10
- Maximus viii extreme specifications summary p.11
- Maximus viii extreme specifications summary p.12
- Maximus viii extreme specifications summary p.13
- Maximus viii extreme specifications summary p.14
- Maximus viii extreme specifications summary p.15
- Oc panel ii specifications summary p.16
- Package contents p.17
- Installation tools and components p.18
- The tools and components in the table above are not included in the motherboard package p.18
- Special features p.19
- Product introduction p.19
- Product highlights p.19
- Chapter 1 product introduction p.19
- Chapter 1 p.19
- Ethernet p.20
- Complete usb 3 integration p.20
- Chapter 1 p.20
- Sonic studio ii p.21
- Sonic senseamp p.21
- Sonic radar ii p.21
- Rog exclusive features p.21
- Gamefirst technology p.21
- Extreme engine digi p.21
- Chapter 1 p.21
- Supremefx 2015 p.21
- Usb bios flashback p.22
- Usb 3 boost p.22
- Rog rich bundled software p.22
- Overwolf p.22
- Keybot ii p.22
- Kaspersk p.22
- Daemon tools pro standard p.22
- Chapter 1 p.22
- Asus special features p.22
- Anti virus p.22
- Ai suite 3 p.22
- Ramcache p.23
- Memtweakit p.23
- Dts connect p.23
- Chapter 1 p.23
- Rog cpu z p.23
- Ramdisk p.23
- Take note of the following precautions before you install motherboard components or change any motherboard settings p.24
- Motherboard overview p.24
- Chapter 1 product introduction p.24
- Chapter 1 p.24
- Before you proceed p.24
- Motherboard layout p.25
- Chapter 1 p.25
- Asus maximus viii extreme p.25
- Layout contents p.26
- Chapter 1 p.26
- Core processors on the lga1151 package with memory and pci express controllers integrated to support dual channel 4 dimm ddr4 memory and 16 pci express 3 2 lanes p.27
- Chapter 1 p.27
- Central processing unit cpu p.27
- Asus maximus viii extreme p.27
- This motherboard supports the new 6th gen inte p.27
- The motherboard comes with four 4 double data rate 4 ddr4 dual inline memory modules dimm slots p.28
- System memory p.28
- Recommended memory configurations p.28
- Chapter 1 product introduction p.28
- Chapter 1 p.28
- You may install 1 gb 2 gb 4 gb and 8 gb unbuffered and non ecc ddr4 dimms into the dimm sockets p.29
- Memory configurations p.29
- Chapter 1 p.29
- Asus maximus viii extreme p.29
- Maximus viii extreme motherboard qualified vendors lists qvl p.30
- Ddr4 3800 oc mhz capability p.30
- Ddr4 3733 oc mhz capability p.30
- Ddr4 3700 oc mhz capability p.30
- Chapter 1 product introduction p.30
- Chapter 1 p.30
- Ddr4 3600 oc mhz capability p.31
- Ddr4 3500 oc mhz capability p.31
- Ddr4 3466 oc mhz capability p.31
- Chapter 1 p.31
- Asus maximus viii extreme p.31
- Ddr4 3400 oc mhz capability p.32
- Ddr4 3333 oc mhz capability p.32
- Chapter 1 product introduction p.32
- Chapter 1 p.32
- Ddr4 3300 oc mhz capability p.33
- Ddr4 3200 oc mhz capability p.33
- Chapter 1 p.33
- Asus maximus viii extreme p.33
- Ddr4 3000 oc mhz capability p.34
- Chapter 1 product introduction p.34
- Chapter 1 p.34
- Ddr4 2800 oc mhz capability p.35
- Chapter 1 p.35
- Asus maximus viii extreme p.35
- Ddr4 2666 oc mhz capability p.36
- Chapter 1 product introduction p.36
- Chapter 1 p.36
- Ddr4 2400 oc mhz capability p.37
- Chapter 1 p.37
- Asus maximus viii extreme p.37
- Ddr4 2133 mhz capability p.38
- Chapter 1 product introduction p.38
- Chapter 1 p.38
- Chapter 1 p.39
- Asus maximus viii extreme p.39
- Expansion slots p.40
- Chapter 1 p.40
- U m sataexpress1 configuration p.41
- Pcie 3 operating mode p.41
- Irq assignments for this motherboard p.41
- Chapter 1 p.41
- Onboard buttons p.42
- Chapter 1 p.42
- Memok button memok p.43
- Installing dimms that are not compatible with the motherboard may cause system boot failure and the dram_led near the memok button lights continuously press and hold the memok button until the dram_led starts blinking to begin automatic memory compatibility tuning for successful boot p.43
- Chapter 1 p.43
- Asus maximus viii extreme p.43
- Chapter 1 p.44
- Chapter 1 p.45
- Chapter 1 p.46
- Onboard leds p.47
- Chapter 1 p.47
- Chapter 1 p.48
- Chapter 1 p.49
- Chapter 1 p.50
- Chapter 1 p.51
- Chapter 1 p.52
- Chapter 1 p.53
- Chapter 1 p.54
- Jumper p.55
- Chapter 1 p.55
- Z170 serial ata 6 gb s and sata express connectors 7 pin sata6g_56 sataexpress12 p.56
- Z170 chipset p.56
- These connectors connect to serial ata 6 gb s hard disk drives via serial ata 6 gb s signal cables p.56
- Rapid storage technology through the onboard inte p.56
- Internal connectors p.56
- If you installed serial ata hard disk drives you can create a raid 0 1 5 and 10 configuration with the inte p.56
- Chapter 1 product introduction p.56
- Chapter 1 p.56
- Chapter 1 p.57
- Chapter 1 p.58
- Chapter 1 p.59
- Cpu water pump cpu optional extension and chassis fan connectors 4 pin cpu_fan 4 pin w_pump 4 pin cpu_opt 5 pin ext_fan 4 pin cha_fan1 4 p.60
- Connect the fan cables to the fan connectors on the motherboard ensuring that the black wire of each cable matches the ground pin of the connector p.60
- Chapter 1 product introduction p.60
- Chapter 1 p.60
- These connectors are for atx power supply plugs the power supply plugs are designed to fit these connectors in only one orientation find the proper orientation and push down firmly until the connectors completely fit p.61
- Chapter 1 p.61
- Atx power connectors 24 pin eatxpwr 8 pin eatx12v_1 4 pin eatx12v_2 4 pin ez_plug p.61
- Asus maximus viii extreme p.61
- Chapter 1 p.62
- Chapter 1 p.63
- Chapter 1 p.64
- Probeit p.65
- Chapter 1 p.65
- Chapter 1 product introduction p.66
- Chapter 1 p.66
- Motherboard installation p.67
- Chapter 2 basic installation p.67
- Chapter 2 p.67
- Building your pc system p.67
- Basic installation p.67
- Chapter 2 p.68
- Cpu installation p.69
- Chapter 2 p.69
- Asus maximus viii extreme p.69
- Chapter 2 basic installation p.70
- Chapter 2 p.70
- Cpu heatsink and fan assembly installation p.71
- Chapter 2 p.71
- Asus maximus viii extreme p.71
- To install the cpu heatsink and fan assembly p.71
- To uninstall the cpu heatsink and fan assembly p.72
- Chapter 2 basic installation p.72
- Chapter 2 p.72
- Dimm installation p.73
- Chapter 2 p.73
- Chapter 2 p.74
- Atx power connection p.74
- Sata device connection p.75
- Chapter 2 p.75
- Front i o connector p.76
- Chapter 2 p.76
- Expansion card installation p.77
- Chapter 2 p.77
- Chapter 2 basic installation p.78
- Chapter 2 p.78
- Wi fi antenna installation p.78
- Installing the asus 3t3r dual band w fi antenna p.78
- Connect the bundled asus 3t3r dual band wi fi antenna connector to the wi fi ports at the back of the chassis p.78
- Usb bios flashback p.79
- Chapter 2 p.79
- Bios update utility p.79
- Rear i o connection p.80
- Motherboard rear and audio connections p.80
- Chapter 2 p.80
- Lan ports led indications p.81
- Chapter 2 p.81
- Audio 2 4 5 or 7 channel configuration p.81
- Chapter 2 p.82
- Audio i o connections p.82
- Chapter 2 p.83
- Chapter 2 p.84
- Thesemodesarefurtherexplainedinthesucceedingsubsections p.84
- The oc panel ii is a device that allows you to overclock your pc without the need to go to thebiossettingsorusesoftwareutilities youcansetuptheocpaneliiinanavailable 5 5 inchdrivebayonyourcomputerchassis normalmode orasanexternalhandheld consoleonan open air octestbench extrememode whenusingtheconsoleasan open air oc test bench you can also control the two pwm fan headers on the oc panel ii fancontrolmode p.84
- Oc panel ii overview p.84
- Oc panel ii p.84
- Ensuretoupdateyourocpanelii sfirmware visitwww asus com for the latest firmwareandupdatesabouttheocpanelii p.84
- Ensurethatyoursystemhasadequatecoolingdesignedforoverclockingbeforeusing the oc panel ii p.84
- Ensurethatyouhaveinstalledrogconnectplusdriverforthenormalmodeofthe oc panel ii p.84
- Chapter 2 basic installation p.84
- Usetheocbutton funtionbutton1 andfanspeedcontrolbutton functionbutton2 to select and adjust values refer to the table above for more information p.85
- Oc panel ii lcm display in normal mode p.85
- Oc panel ii lcm display in fan control mode p.85
- Normal fan control extreme p.85
- Function button 2 fan speed control oc panel ii pwm fan duty cycle control safeboot button p.85
- Function button 1 cpu level up fan selection retry p.85
- Chapter 2 p.85
- Asus maximus viii extreme p.85
- Oc panel ii lcm display in extreme mode p.86
- Extrememodecapabilitiesincludingv1 v2 dram andothervoltagedefinitionsvaryby chipset please refer to your motherboard manual for details p.86
- Chapter 2 basic installation p.86
- Chapter 2 p.86
- Setting up your oc panel ii in normal mode p.87
- Chapter 2 p.87
- Chapter 2 p.88
- Chapter 2 p.89
- Setting up your oc panel ii in extreme mode p.90
- Chapter 2 p.90
- Turning off the computer p.91
- Starting up for the first time p.91
- Chapter 2 p.91
- Chapter 2 basic installation p.92
- Chapter 2 p.92
- Bios setup p.93
- Knowing bios p.93
- Chapter 3 bios setup p.93
- Chapter 3 p.93
- Entering bios setup after post p.94
- Entering bios at startup p.94
- Chapter 3 p.94
- Bios setup program p.94
- Bios menu screen p.94
- The default screen for entering the bios setup program can be changed refer to the setup mode item in section boot menu for details p.95
- The boot device options vary depending on the devices you installed to the system p.95
- Hotkey for the advanced bios settings p.95
- Ez mode p.95
- Chapter 3 p.95
- Asus maximus viii extreme p.95
- Chapter 3 p.96
- Advanced mode p.96
- The advanced mode provides advanced options for experienced end users to configure the bios settings the figure below shows an example of the advanced mode refer to the following sections for the detailed configurations p.96
- Hotkey p.96
- Chapter 3 bios setup p.96
- Submenu items p.97
- Qfan control f6 p.97
- Myfavorite f3 p.97
- Menu items p.97
- Menu bar p.97
- Language p.97
- Ez tuning wizard f11 p.97
- Chapter 3 p.97
- Last modified button p.98
- Hot keys p.98
- General help p.98
- Configuration fields p.98
- Chapter 3 p.98
- Scroll bar p.98
- Quick note f9 p.98
- My favorites p.99
- Chapter 3 p.99
- Adding items to my favorites p.99
- Main menu p.100
- Chapter 3 p.100
- The security menu items allow you to change the system security settings p.101
- Security p.101
- Chapter 3 p.101
- Asus maximus viii extreme p.101
- User password p.102
- Chapter 3 p.102
- Administrator password p.102
- Chapter 3 p.103
- Ai overclock tuner auto p.103
- Extreme tweaker menu p.103
- Cpu core ratio sync all cores p.104
- Chapter 3 p.104
- Asus multicore enhancement auto p.104
- Xtreme tweaking disabled p.105
- Tpu keep current settings p.105
- Epu power saving mode disabled p.105
- Dram timing control p.105
- Dram odd ratio mode enabled p.105
- Dram frequency auto p.105
- Cpu svid support auto p.105
- Chapter 3 p.105
- External digi power control p.106
- Chapter 3 p.106
- Chapter 3 p.107
- Boot voltages p.108
- Dmi boot voltage auto p.108
- Cpu core cache boot voltage auto p.108
- Core pll boot voltage auto p.108
- Chapter 3 p.108
- Internal cpu power management p.109
- Cpu vccio boot voltage auto p.109
- Cpu system agent boot voltage auto p.109
- Chapter 3 p.109
- Tweaker s paradise p.110
- Chapter 3 p.110
- Min cpu cache ratio auto p.111
- Max cpu cache ratio auto p.111
- Cpu core cache voltage auto p.111
- Cpu core cache current limit max auto p.111
- Chapter 3 p.111
- Chapter 3 p.112
- Pll termination voltage auto p.112
- Pch core voltage auto p.112
- Dram voltage auto p.112
- Dram ref voltage control p.112
- Cpu vccio voltage auto p.112
- Cpu system agent voltage auto p.112
- Cpu standby voltage auto p.112
- Chapter 3 p.113
- Advanced menu p.113
- Intel virtualization technology enabled p.114
- Hardware prefetcher enabled p.114
- Cpu configuration p.114
- Chapter 3 p.114
- Adjacent cache line prefetcher enabled p.114
- Active processor cores all p.114
- Boot performance mode auto p.115
- Cpu power management configuration p.115
- Chapter 3 p.115
- Platform misc configuration p.116
- Pci express native power management disabled p.116
- Chapter 3 p.116
- Vt d disabled p.117
- System agent sa configuration p.117
- Sa pci express p.117
- Peg aspm disabled p.117
- Pch pci express p.117
- Dmi link aspm control disabled p.117
- Chapter 3 p.117
- Aspm support disabled p.117
- Graphics configuration p.118
- Dmi opi configuration p.118
- Chapter 3 p.118
- Peg port configuration p.118
- Supremefx rog audio led enabled p.119
- Rog effects p.119
- Pch logo led enabled p.119
- Onboard led enabled p.119
- Chapter 3 p.119
- Pci express configuration p.120
- Pch storage configuration p.120
- Pch configuration p.120
- Chapter 3 p.120
- Smart self test on p.121
- Sata6g_1 gray sata6g_6 gray p.121
- Sata mode selection ahci p.121
- Sata controller s enabled p.121
- Chapter 3 p.121
- Aggressive lpm support disabled p.121
- Xhci hand off disabled p.122
- Usb single port control p.122
- Usb configuration p.122
- Legacy usb support enabled p.122
- Chapter 3 p.122
- Network stack disabled p.123
- Network stack configuration p.123
- Chapter 3 p.123
- Pciex4_4 bandwidth auto p.124
- Onboard devices configuration p.124
- Hd audio controller enabled p.124
- Chapter 3 p.124
- Asmedia usb 3 x battery charging support disabled p.124
- Asmedia usb 3 controller usb3_e12 enabled p.124
- Asmedia usb 3 controller usb3 _e34 enabled p.124
- Asmedia storage controller sata6g_e12 enabled p.125
- Wi fi controller enabled p.125
- Intel lan controller enabled p.125
- Intel ar usb3 enabled p.125
- Chapter 3 p.125
- Bluetooth controller enabled p.125
- Restore ac power loss power off p.126
- Power on by rtc disabled p.126
- Power on by pci e pci disabled p.126
- Erp ready disabled p.126
- Chapter 3 p.126
- Apm configuration p.126
- Thunderbolt boot support disabled p.127
- Intel thunderbolt technology disabled p.127
- Intel r thunderbolt p.127
- Hdd sdd smart information p.127
- Chapter 3 p.127
- Q fan configuration p.128
- Monitor menu p.128
- Chapter 3 p.128
- Chapter 3 p.129
- Chapter 3 p.130
- Chapter 3 p.131
- Chapter 3 p.132
- Anti surge support on p.132
- Fast boot enabled p.133
- Chapter 3 p.133
- Boot menu p.133
- Boot logo display auto p.133
- Interrupt 19 capture disabled p.134
- Chapter 3 p.134
- Boot up numlock state enabled p.134
- Above 4g decoding disabled p.134
- Wait for f1 if error enabled p.134
- Setup mode advanced mode p.134
- Option rom messages enabled p.134
- Secure boot p.135
- Csm compatibility support module p.135
- Chapter 3 p.135
- Chapter 3 p.136
- Chapter 3 p.137
- Boot override p.137
- Boot option priorities p.137
- Tool menu p.138
- Setup animator disabled p.138
- Secure erase p.138
- Chapter 3 p.138
- Asus ez flash 3 utility p.138
- Asus maximus viii extreme p.139
- Chapter 3 p.139
- Save to profile p.140
- Profile name p.140
- Load save profile from to usb drive p.140
- Force bios1 bios2 boot p.140
- Copy bios1 bios2 to bios2 bios1 p.140
- Chapter 3 p.140
- Bios flashback p.140
- Asus overclocking profile p.140
- Save above settings p.141
- Rog oc panel h key configure p.141
- Load from profile p.141
- Load default p.141
- Chapter 3 p.141
- Bus interface p.142
- Asus spd information p.142
- Graphics card information p.142
- Gpu post p.142
- Dimm slot number p.142
- Chapter 3 p.142
- Save changes reset p.143
- Load optimized defaults p.143
- Launch efi shell from usb devices p.143
- Exit menu p.143
- Discard changes exit p.143
- Chapter 3 p.143
- Updating bios p.144
- Ez update p.144
- Chapter 3 p.144
- Chapter 3 p.145
- Asus ez flash 3 utility p.145
- Asus crashfree bios 3 p.146
- Recovering the bios p.146
- Chapter 3 p.146
- Please select boot device p.147
- Chapter 3 p.147
- Booting the system in dos environment p.147
- Before updating bios p.147
- Asus bios updater p.147
- Within five 5 seconds to enter freedos prompt p.148
- Updating the bios file p.148
- To update the bios file p.148
- To switch the disk from drive c optical drive to drive d usb flash drive p.148
- To switch from files panel to drives panel then select d p.148
- Chapter 3 bios setup p.148
- Chapter 3 p.148
- Chapter 3 p.149
- Chapter 3 p.150
- Chapter 3 bios setup p.150
- Support dvd information p.151
- Software support p.151
- Running the support dvd p.151
- Installing an operating system p.151
- Chapter 4 software support p.151
- Chapter 4 p.151
- Support dvd main menu p.152
- Runthesupportdvd p.152
- Readerfromthe utilities tabbeforeopeningthefiles p.152
- Obtaining the software manuals p.152
- Inthesupportdvdmainmenu clickthe manual tab p.152
- Clickthesoftwaremanualthatyouwishtoread p.152
- Chapter 4 software support p.152
- Chapter 4 p.152
- Acroba p.152
- Toreadaboutyourmotherboard ssoftwaremanual p.152
- Thesoftwaremanualsareincludedinthesupportdvd followtheinstructionsbelowtoget thenecessarysoftwaremanuals p.152
- Thesoftwaremanualfilesareinportabledocumentformat pdf installtheadob p.152
- Software information p.153
- Installing ai suite 3 p.153
- Chapter 4 p.153
- Ai suite 3 p.153
- Launching ai suite 3 p.154
- Chapter 4 p.154
- Theaisuitemainmenuincludesisaquick accessmenubarthatallowsyoutoswiftlylaunch anyoftheintegratedasusutilities click p.155
- Theaisuite3mainmenugivesyoueasy accesscontrolsandinsighttowhat sgoingon withyourcomputer allowingyoutooptimizeperformancesettingswhileatthesametime ensuringsystemstability p.155
- Ontheleftofthemenutolaunchthemenubar p.155
- Chapter 4 p.155
- Asus maximus viii extreme p.155
- Ai suite 3 main menu bar p.155
- Ai suite 3 main menu p.155
- Way optimization p.156
- Dual intelligent processors 5 p.156
- Chapter 4 p.156
- Using tpu p.157
- Turbo processing unit tpu p.157
- Tpuallowsyoutomanuallyadjustthecpufrequency cpucache corefrequencies dram frequency andrelatedvoltagesforanenhancedsystemstabilityandaperformanceboost p.157
- Cpu frequency p.157
- Chapter 4 p.157
- Asus maximus viii extreme p.157
- Gpu boost p.158
- Chapter 4 software support p.158
- Chapter 4 p.158
- Turbo app p.159
- Chapter 4 p.159
- Chapter 4 p.160
- Asusfanxpert3providescustomizablesettingsofyourfansforacoolerandmorequiet computingenvironment withitsfanautotuningfeature asusfanxpert3automatically tweaksthesettingsofcpuandchassisfanstoachievetheirbestcoolingperformance asusfanxpert3alsosupportshardwarelevelpwm dccombomodeforthecpuand chassisfans youcanalsoreducethecpufanspeedbelowthedefaultminimumfora noiselessoperationduringlightloads p.160
- Using epu p.160
- Fan xpert 3 p.160
- Epuisareal timesystempower savingchipthatautomaticallydetectsthecurrent systemloadandintelligentlymoderatespowerusage itoffersatotalsystem wideenergy optimization reducesfannoise andextendsthelifespanofyourhardwarecomponents p.160
- Energy processing unit epu p.160
- Chapter 4 software support p.160
- Digi power control p.161
- Chapter 4 p.161
- Pccleanerallowsyoutocleanthesystemjunkfilesbyscanninganddeletingselectedfiles p.162
- Pc cleaner p.162
- Chapter 4 software support p.162
- Chapter 4 p.162
- Chapter 4 p.163
- Asus maximus viii extreme p.163
- Aicharger allowsyoutofast chargeyourportablebc1 mobiledevicesonyour computer susbportthreetimesfasterthanthestandardusbdevices p.163
- Ai charger screen p.163
- Ai charger p.163
- Tolaunchaicharger click p.163
- Ontheleftoftheaisuite3mainmenu thenselect ai charger p.163
- Launching ai charger p.163
- Using the usb 3 boost p.164
- Usb3 boosttechnologysupportsuasp usbattachedscsiprotocol thatautomatically speedsupthetransferratesofyourusbstoragedevices p.164
- Usb 3 boost p.164
- Tolaunchusb3 boost click p.164
- Ontheleftoftheaisuite3mainmenu thenselect usb 3 boost p.164
- Launching usb 3 boost p.164
- Chapter 4 software support p.164
- Chapter 4 p.164
- Launching ez update p.165
- Ez update screen p.165
- Ez update p.165
- Chapter 4 p.165
- Chapter 4 p.166
- System information p.166
- Launching the system information p.166
- Mobo connect screen p.167
- Mobo connect p.167
- Launching mobo connect p.167
- Chapter 4 p.167
- Using usb bios flashback p.168
- Usb bios flashback p.168
- Launching usb bios flashback p.168
- Chapter 4 p.168
- Chapter 4 p.169
- Wi fi engine p.170
- Using wi fi engine p.170
- Launching wi fi engine p.170
- Chapter 4 p.170
- Asus maximus viii extreme p.171
- Using the ap mode p.171
- Touseapmode clickortap ap mode onthewi fienginemenu p.171
- Theapmodeallowsyoutosetyoursystemasanaccesspointforotherwireless enabled devices p.171
- Somenetworksmayrequireyoutokeyinapassword p.171
- Fromthelistofavailablenetworks selectanetworkthatyou wanttoconnectto p.171
- Chapter 4 p.171
- Wi fi go and remote go p.172
- System requirements p.172
- Smart device supported screen resolutions p.172
- Chapter 4 p.172
- Asus account login p.172
- Logging in p.173
- Creating an asus account p.173
- Chapter 4 p.173
- Using wi fi go p.174
- Chapter 4 p.174
- Wi fi go nfc remote app for smart devices p.175
- Chapter 4 p.175
- Using the wake on lan p.176
- Chapter 4 p.176
- Tousecloudgo p.177
- Logintoyourcloudaccountthenclickortap sign in p.177
- Googledrive andskydriv p.177
- Cloudgo allowsyoutocontrolandsynchronizeyourfilesacrossmultiplecloudservices suchasasuswebstorage dropbo p.177
- Cloud go p.177
- Clickortap cloud go p.177
- Chapter 4 p.177
- Asus maximus viii extreme p.177
- Remote desktop p.178
- Onyoursmartdevice tap remote desktop p.178
- Chapter 4 software support p.178
- Chapter 4 p.178
- Touseremotedesktop p.178
- Remotedesktopallowsyoutoremotelycontrolyourdesktopinreal timeusingyoursmart device p.178
- Remote desktop interface for window p.178
- Remote desktop control notification p.179
- Chapter 4 p.179
- File transfer p.180
- Chapter 4 p.180
- System requirements p.181
- Remote keyboard mouse p.181
- Chapter 4 p.181
- Asus media streamer p.181
- Iossupportsthefollowingmediaformats mov mp4 mpv gp p.182
- Chapter 4 software support p.182
- Chapter 4 p.182
- Android gp mp4 m4a aac ts flac mp3 mid xmf mxmf rtttl rtx ota imy ogg mkv wav jpg gif png bmp webp webm p.182
- Adding and deleting media files p.182
- Youcanusepushnoticetoreceiveamedialink thelinkcanbeclickedandallowsyou toplaythefiledirectly p.182
- Touseasusmediastreamer p.182
- Thefollowingmediaformatsaresupportedbyandroidandiosdevices p.182
- Onyourcomputer click asus homecloud thenselect media streamer fromtheminibar onyourdevice clickortap media streamer p.182
- Push notice screen p.183
- Push notice p.183
- Pairing your computer and smart device p.183
- Launching push notice on your computer p.183
- Chapter 4 p.183
- Thisfeatureallowsyoutosendalertsoftheunusualactivitiesofthevoltage temperature andfansettingsofyourcomputertoyoursmartdevice p.184
- Thisfeatureallowsyoutorestart shutdown orputyourcomputertosleepmodeandsends analerttoyoursmartdevice p.184
- Setting up pc status alerts p.184
- Setting up pc mode alerts of your computer p.184
- Chapter 4 software support p.184
- Chapter 4 p.184
- Asus maximus viii extreme p.185
- Youcanalsosendmessagesviathepushnoticemessagingshortcutonthelower right p.185
- Viewing your computer status on your smart device p.185
- Thisfeatureallowsyoutosendmessagestoyoursmartdevice p.185
- Thenselect p.185
- Sending messages to your smart device p.185
- Onyoursmartdevicetolaunchpushnotice p.185
- Cornerofyourscreen todothis click thenclick p.185
- Chapter 4 p.185
- Sonic studio ii p.186
- Rog audio features p.186
- Installing the software p.186
- Chapter 4 p.186
- Chapter 4 p.187
- Perfect voice p.188
- Chapter 4 p.188
- Casting enhancer p.189
- Chapter 4 p.189
- Sonic senseamp p.190
- Chapter 4 p.190
- Chapter 4 p.191
- Asus maximus viii extreme p.191
- Afteryouclosethepop window sonicsenseampentersspeakerconfigurationanddisplays theadjustedheadphoneimpedance p.191
- Dts connect p.192
- Chapter 4 p.192
- Sonicradariiisdesignedforfirstpersonshooting fps gamesandshowstheprecise directionandintensityofwhereasoundiscomingfrom itfeaturesasimpleandfriendly user interfaceandalsofeaturessoundenhancerstoamplifydesiredsoundeffects p.193
- Sonic radar ii p.193
- Display menu p.193
- Customizethesettingsforeachgameincludingtransparency signal size andremanency p.193
- Chapter 4 p.193
- Asus maximus viii extreme p.193
- Chapter 4 p.194
- Asus maximus viii extreme p.195
- Tousegamefirstiii double click p.195
- Optimization mode gamepacketsareprioritizedandotherpacketsalsooptimized p.195
- Onthedesktop p.195
- Media streaming mode media streamingpacketsgiventoppriority p.195
- Gamefirstiiiisanetworkmanagementsoftwarethatfeaturesfourpresetpacketprioritized profiles optimization game mediastreamingandfilesharing facilitatingdifferentuser scenarios userscanalsomanuallyallocatebandwidthandadjustprioritysettingsofeach applicationtorunfasterandsmoother p.195
- Gamefirst iii p.195
- Game mode gamepacketsgiventoppriority p.195
- File sharing mode file sharingpacketsgiventoppriority p.195
- Chapter 4 p.195
- Network monitor p.196
- Chapter 4 p.196
- Using the network information p.197
- Displaysinformationaboutthephysicalnetworkcardsuchasspeed physicaladdress ip address subnetmask anddefaultgateway p.197
- Chapter 4 p.197
- Bandwidth test p.197
- Asus maximus viii extreme p.197
- Youcanusethisfeaturetotesttheinternetserviceprovider isp speedormanuallykeyin thedesireduploading downloadingspeedandapplythespeedifneeded p.197
- Keybot ii p.198
- Chapter 4 p.198
- Chapter 4 p.199
- Chapter 4 p.200
- Asus media streamer p.200
- Thefollowingmediaformatsaresupported gp mp4 m4a aac ts flac mp3 mid xmf mxmf rtttl rtx ota imy ogg mkv wav jpg gif png bmp webp webm p.201
- Chapter 4 p.201
- Asus maximus viii extreme p.201
- Adding and deleting media files p.201
- To create ramdisk drives p.202
- Ramdiskisadata storagesoftwarethatreservesapartofyoursystem smemoryand turnsitintoahigh speedvirtualdrivewhereyoucanstorecachefilesandgameappsfor instantaccess thedynamicmemoryallocationfunctioncanreleasetheunusedmemory oframdiskbacktothesystemwhenneededandhelpsextendthelifespanofyourssdor hdd p.202
- Ramdisk p.202
- Creating deleting a ramdisk drive p.202
- Chapter 4 software support p.202
- Chapter 4 p.202
- Yourramdiskdriveallowsyoutoplaceyourfavoriteapplicationsandfilesintoramsoyou canutilizeyourramspeedforbetterread writeperformance thefilesthatarestoredinside theramdiskareautomaticallybackedupeverytimeyourpcisturnedoff p.202
- Tolaunchramdisk click p.202
- To delete or format an existing ramdisk drive p.203
- Theformatfunctionisavailableonlyifyouenablethedynamicmemoryallocationfunction onyourdisk p.203
- Creating deleting a junction point p.203
- Chapter 4 p.203
- Asus maximus viii extreme p.203
- Ajunctionpointcreatesalinkthatremapstheoriginalcontentsintotheramdisk enabling accesstothedesiredapplicationordatatobedonepurelywithintheoriginalfilelocation p.203
- Synchronizing backup files p.204
- Chapter 4 p.204
- Memtweakit p.205
- Chapter 4 p.205
- Validating and saving your memtweakit settings p.206
- Chapter 4 p.206
- Rog cpu z p.207
- Chapter 4 p.207
- Ramcache p.208
- Chapter 4 p.208
- Touselightingcontrol doubleclick p.209
- Onthedesktop p.209
- Lightingcontrolallowsyoutoadjusttheonboardrgbleds colorandalsoselectdifferent lighteffects settingsmadecanbepreviewedtotheleftofthesettings p.209
- Lighting control p.209
- Chapter 4 p.209
- Asus maximus viii extreme p.209
- Chapter 4 software support p.210
- Chapter 4 p.210
- Raid support p.211
- Raid definitions p.211
- Raid configurations p.211
- Chapter 5 raid support p.211
- Chapter 5 p.211
- Chapter 5 p.212
- Setting the raid item in bios p.212
- Installing serial ata hard disks p.212
- Turn on the system p.213
- To enter the inte p.213
- To display the utility main menu p.213
- The utility supports maximum four hard disk drives for raid configuration p.213
- The raid bios setup screens shown in this section are for reference only and may not exactly match the items on your screen p.213
- The navigation keys at the bottom of the screen allow you to move through the menus the navigation keys at the bottom of the screen allow you to move through the menus and select the menu options p.213
- Rapid storage technology option rom utility p.213
- Intel rapid storage technology option rom utility p.213
- Chapter 5 p.213
- Asus maximus viii extreme p.213
- The following screen appears p.214
- Creating a raid set p.214
- Chapter 5 raid support p.214
- Chapter 5 p.214
- To select the hard disk drives you want to include in the raid set the select disks screen appears p.214
- To create a raid set p.214
- Chapter 5 p.215
- To return to the delete volume menu p.216
- To delete a raid set p.216
- The following warning message appears p.216
- The following screen appears p.216
- Deleting a raid set p.216
- Chapter 5 raid support p.216
- Chapter 5 p.216
- Be cautious when deleting a raid set you will lose all data on the hard disk drives when you delete a raid set p.216
- Rapid storage technology option rom utility p.217
- Exiting the inte p.217
- Creating a raid driver disk without entering the os p.217
- Creating a raid driver disk p.217
- Chapter 5 p.217
- Os installation p.218
- Installing the raid driver during windows os installation p.218
- Installing the raid driver during window p.218
- Creating a raid driver disk in windows p.218
- Creating a raid driver disk in window p.218
- Chapter 5 p.218
- Notices p.219
- Federal communications commission statement p.219
- Appendix p.219
- Vcci japan compliance statement p.220
- Kc korea warning statement p.220
- Ic canadian compliance statement p.220
- Class b ite p.220
- Canadian department of communications statement p.220
- Appendix p.220
- Appendix p.221
- Wireless radio use p.221
- Rf equipment notices p.221
- Exposure to radio frequency energy p.221
- Ce european community compliance statement p.221
- Asus recycling takeback services p.221
- Ncc taiwan wireless statement p.222
- Japan rf equipment statement p.222
- Google license terms p.222
- Fcc bluetooth wireless compliance p.222
- Bluetooth industry canada statement p.222
- Appendix p.222
- Asus maximus viii extreme p.223
- Appendix p.223
- Asus computer international america p.224
- Asus computer gmbh germany and austria p.224
- Appendix p.224
- Technical support p.224
- Asustek computer inc p.224
- Asus contact information p.224
- Ec conformity marking p.225
- Declare the following apparatus p.225
- Declaration of conformity p.225
- Declaration date 09 09 2015 declaration date 09 09 2015 p.225
- Conform with the essential requirements of the following directives p.225
- Year to begin affixing ce marking 2015 p.225
- Ce marking p.225
- We the undersigned p.225
- Asus maximus viii extreme p.225
- Ver 140331 p.225
- Appendix p.225
- Signature p.225
- 95 ec lvd directive p.225
- Product name p.225
- 65 eu rohs directiv p.225
- Position ceo p.225
- 5 ec r tte directive p.225
- Name jerry shen p.225
- 125 ec erp directive p.225
- Motherboard p.225
- 108 ec emc directive p.225
- Model name p.225
- Maximus viii extreme p.225
- Ec declaration of conformity p.225
- Ver 140331 p.226
- 95 ec lvd directive p.226
- Signature signature p.226
- 65 eu rohs directiv p.226
- Product name p.226
- 5 ec r tte directive p.226
- Position ceo p.226
- 125 ec erp directive p.226
- Oc panel ii p.226
- 108 ec emc directive p.226
- Name jerry shen p.226
- Motherboard oc accessory p.226
- Model name p.226
- Ec declaration of conformity p.226
- Ec conformity marking p.226
- Declare the following apparatus p.226
- Declaration of conformity p.226
- Declaration date 09 09 2015 p.226
- Conform with the essential requirements of the following directives p.226
- Year to begin affixing ce marking 2015 p.226
- Ce marking p.226
- We the undersigned p.226
- Appendix p.226
Похожие устройства
-
 Asus TUF GAMING B550-PROРуководство по быстрому запуску
 -
 Asus PRIME A520M-A IIКраткое руководство пользователя
 -
 Asus PRIME B250M-PLUSКраткое руководство
 -
 Asus TUF GAMING Z590-PLUSКраткое руководство
 -
 Asus ProArt B650-CREATORКраткий обзор функций
 -
 Asus TUF GAMING B650-PLUSБыстрый старт
 -
 Asus ROG STRIX X670E-I GAMING WIFIКраткое руководство пользователя
 -
Asus ROG FPS-IIРуководство по быстрому запуску
-
 Asus Pro WS W680M-ACE SEКраткая эксплуатационная инструкция
 -
 Asus PRIME B760M-A WIFI D4Инструкция в сокращённом виде
 -
 Asus PRIME H770-PLUSБыстрый старт
 -
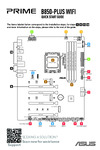 Asus B850-PLUS WIFIКраткое руководство
Узнайте, как настроить управление удаленным доступом на вашем устройстве. Пошаговая инструкция по отправке авторизации и использованию функции удаленного рабочего стола.